Sign Language Digits Recognition using Deep CNN
In this tutorial, we will design and implement a deep learning model that learns to recognize digits from sign language. We will be using a convolution neural network built using Keras API and trained on the Turkey Ankara Ayrancı Anadolu High School’s Sign Language Digits Dataset. Many thanks to Arda Mavi for sharing this dataset.
Introduction
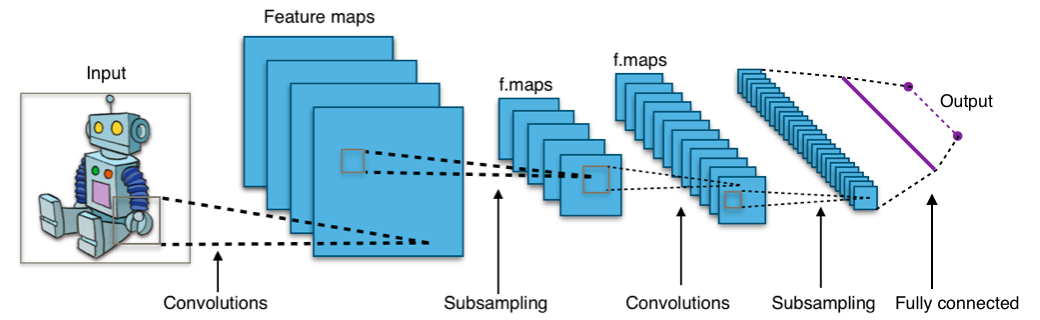
Convolutional Neural Networks (or CNNs) are one of the most famous deep learning models. It’s widely used in computer vision, and other deep learning tasks. In fact, Using CNNs is a clever way to reduce the number of parameters. Instead of training a fully connected network, a CNN reuses the same parameter multiple times. Thus, it’s a practical approach to reduce the amount of training time. Over a short period of time, CNNs become the state-of-the-art results in multiple domains, from text to speech going well beyond the initial image processing domain where they were originally conceived.
How CNN works?
The most important building blocks in a CNN are convolutional layers and filters. the input data passes through the convolutions and then it will be convolved with filters. This architecture allows the network to detect low-level features in the first hidden layers then assemble them into higher-level features in the next hidden layers. This hierarchical approach is commonly used in the real world imagery problems.
Let’s build it up!
First, we import the necessary tools.
1
2
3
4
5
6
7
8
9
10
11
12
13
14
    from keras import backend as K
    from keras.models import Sequential
    from keras.layers.convolutional import Conv2D
    from keras.layers.convolutional import MaxPooling2D
    from keras.layers.core import Activation, Flatten, Dropout, Dense
    from keras.utils import np_utils
    from keras.optimizers import SGD, RMSprop, Adam
    from keras.preprocessing.image import ImageDataGenerator
    from keras import callbacks
    import glob
    import numpy as np
    import os.path as path
    from scipy import misc
    import matplotlib.pyplot as plt
We set some matplotlib configuration for better display of graphs.
1
2
    %matplotlib inline
    plt.rcParams['figure.figsize'] = [20, 10]
Details of datasets
- Image size: 100 x 100 pixels
- Image size: 100 x 100 pixels
- Color space: RGB
- Number of classes: 10 (Digits: 0-9)
- Number of participant students: 218
- Number of samples per student: 1
We structure our dataset in two main folders, one for the training set and one for the validation set. each folder has subfolders named with the digit represented by the img within it, from 0 to 9. the split the whole dataset with a ratio of 20/80. 80% for training and 20% for validation.
1
2
    train_data_path = 'Dataset/train'
    validation_data_path = 'Dataset/validation'
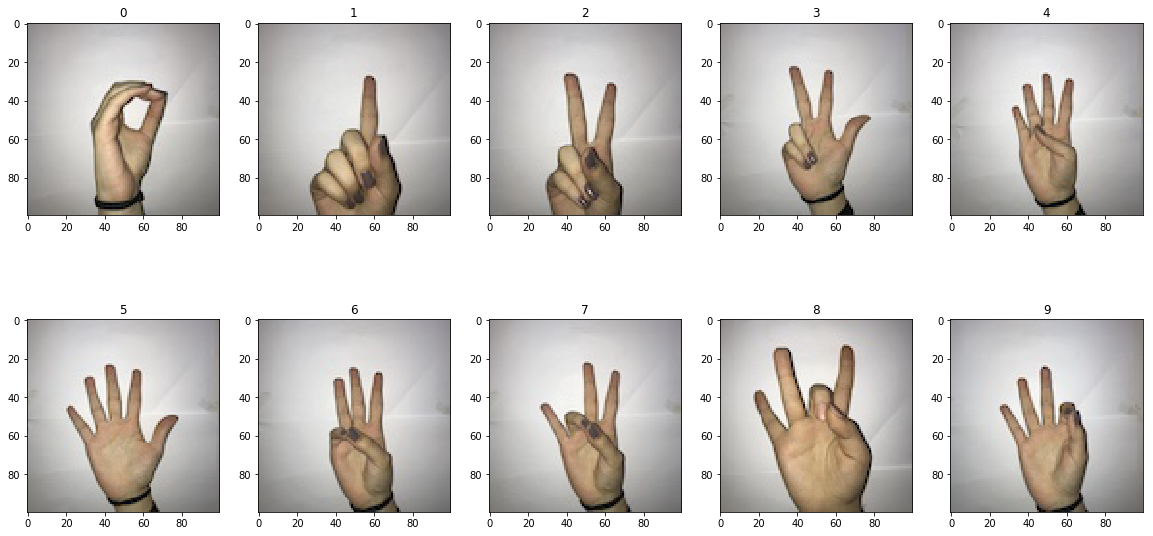
Let’s show one example from each subfolder, which represent a specific sign digit. We loop through the subfolders and plot the first image.
1
2
3
4
5
6
7
8
9
10
11
    figure = plt.figure()
    for i in range(10):
      IMAGE_PATH = train_data_path+'/'+str(i)
      file_paths = glob.glob(path.join(IMAGE_PATH, '*.jpg'))
      image = misc.imread(file_paths[0])
      image = np.asarray(image)
      figure.add_subplot(2,5, i+1)
      plt.imshow(image)
      plt.title(i)

    plt.show()
The following figure shows the different samples of each digit:
Our dataset is ready to feed the hunger of our deep learning model. But wait ! you might be wondering why we did do any data preprocessing? That’s a fundamental question in machine learning pipelines, however, we will be using a very useful class in Keras called ImageDataGenerator. It will take care of normalizing our data and also generating batches of image data with real-time data augmentation(image processing). The latter concept will allow us to have more training data to improve the performance of our model.
Deep CNN Model
Let’s prepare our model’s parameters ! if you are familiar with deep learning terminologies, you will easily understand the purpose of each variable from its name.
1
2
3
4
5
6
7
8
9
10
11
12
img_width, img_height = 100, 100
batch_size = 32
samples_per_epoch = 1000
validation_steps = 300
nb_filters1 = 32
nb_filters2 = 64
conv1_size = 3
conv2_size = 2
pool_size = 2
classes_num = 10
epochs = 100
lr = 0.001
For this project, We will be using a deep CNN, it’s defined as the following sequence of blocks:
Convolution => Relu activation => Convolution => Relu activation => Max Pooling => Dropout => Convolution => Relu activation => Convolution => Relu activation => Max Pooling => Dropout => Flatten => Dense => Relu activation => Dropout => Dense
1
2
3
4
5
6
7
8
9
10
11
12
13
14
15
16
17
18
19
20
21
22
23
24
25
26
27
28
29
30
31
32
33
34
35
    class CNN:
        @staticmethod
        def build(input_shape, classes):

                  model = Sequential()

                  model.add(Conv2D(32, (3,3), padding='same', input_shape=input_shape))
                  model.add(Activation('relu'))

                  model.add(Conv2D(32, (3,3), padding='same'))
                  model.add(Activation('relu'))

                  model.add(MaxPooling2D(pool_size=(pool_size,pool_size), strides=(2,2)))

                  model.add(Dropout(0.25))

                  model.add(Conv2D(64, (3,3), padding='same'))
                  model.add(Activation('relu'))

                  model.add(Conv2D(32, (3,3), padding='same'))
                  model.add(Activation('relu'))

                  model.add(MaxPooling2D(pool_size=(pool_size,pool_size)))

                  model.add(Dropout(0.25))

                  model.add(Flatten())
                  model.add(Dense(512))
                  model.add(Activation('relu'))

                  model.add(Dropout(0.25))
                  model.add(Dense(classes))
                  model.add(Activation('softmax'))

                  return model
The previous class create our deep learning and make it ready to be compiled.
1
2
3
4
    model = CNN.build((img_width, img_height, 3),classes_num)
    model.compile(loss='categorical_crossentropy',
    optimizer=RMSprop(lr=lr),
    metrics=['accuracy'])
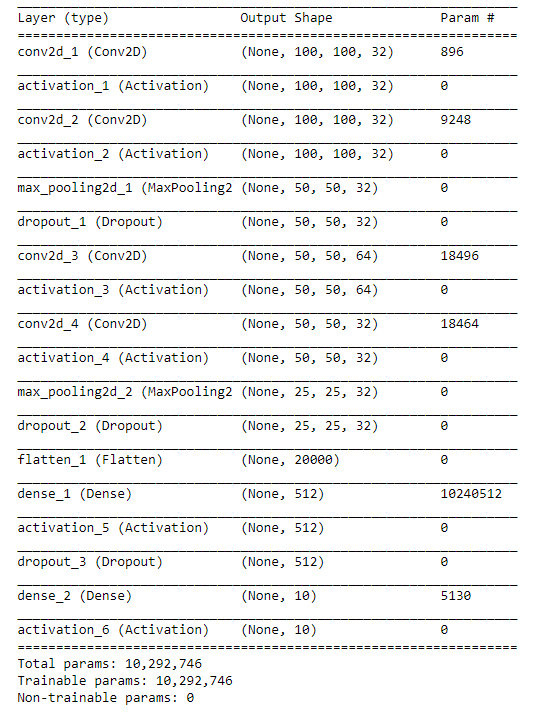
Keras API gives us the possibility to take a look at a summary of our model and have an idea about the number of our trainable parameters.
1
    model.summary()
Yaay, The model is ready! Let’s unleash the power of CNN. Time to prepare our data generators.
1
2
    train_datagen = ImageDataGenerator(rescale=1. / 255, shear_range=0.2, zoom_range=0.2)
    train_generator = train_datagen.flow_from_directory( train_data_path, target_size=(img_height, img_width), batch_size=batch_size, class_mode='categorical')
1
2
  test_datagen = ImageDataGenerator(rescale=1. / 255)
  validation_generator = test_datagen.flow_from_directory(validation_data_path, target_size=(img_height, img_width), batch_size=batch_size, class_mode='categorical')
Our generated and prepared data is ready, time to start training. Thr training will take quite long time.
1
2
    history = model.fit_generator(train_generator, samples_per_epoch=samples_per_epoch, epochs=epochs,
    validation_data=validation_generator, validation_steps=validation_steps)
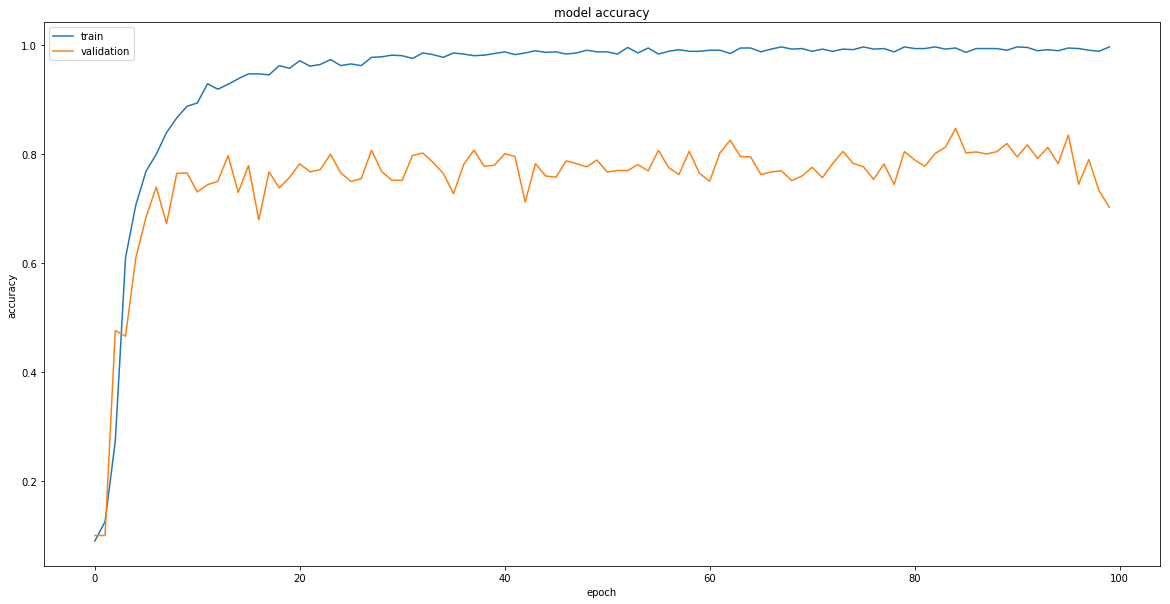
To see how our model was doing during its training, we plot the accuracy and loss function value in each iteration.
1
2
3
4
5
6
7
8
9
    print(history.history.keys())
    # "Accuracy"
    plt.plot(history.history['acc'])
    plt.plot(history.history['val_acc'])
    plt.title('model accuracy')
    plt.ylabel('accuracy')
    plt.xlabel('epoch')
    plt.legend(['train', 'validation'], loc='upper left')
    plt.show()
1
2
3
4
5
6
7
8
    # "Loss"
    plt.plot(history.history['loss'])
    plt.plot(history.history['val_loss'])
    plt.title('model loss')
    plt.ylabel('loss')
    plt.xlabel('epoch')
    plt.legend(['train', 'validation'], loc='upper left')
    plt.show()
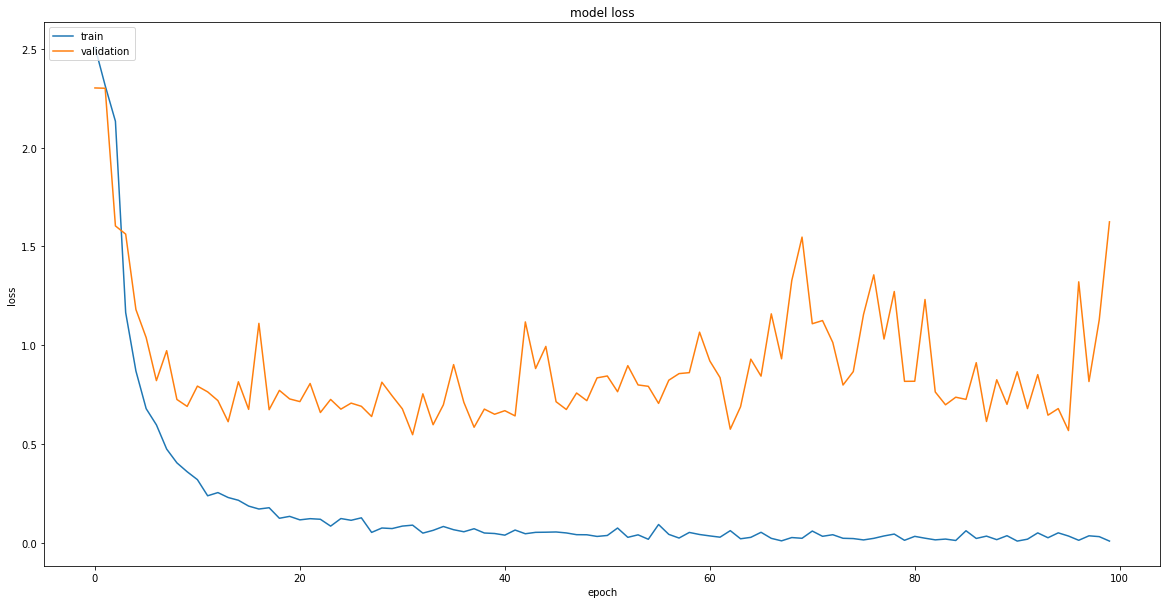
Training is done! and now our model is a master at recognizing sign language digits. in terms of numbers, We achieved the following scores for two different architectures.
LeNet
Training set :
1
    loss: 0.0320 - accuracy: 0.9909
Validation set :
1
    loss: 0.9061 - accuracy: 0.737
Deep CNN
Training set :
1
    loss: 0.0331 - acc: 0.9950
Validation set :
1
    loss: 0.5674 - acc: 0.835
Time to save our model!
1
2
3
4
    #Save the model
    model_json = model.to_json()
    open('signs-cnn.json', 'w').write(model_json)
    model.save_weights('signs-weights.h5', overwrite=True)
Our model is trained and saved. Now, we can load it and use it to recognize sign language digits from the unseen example. First, we load it again. ( this step is just to show you how to save your model later for production).
1
2
3
4
5
6
7
8
9
10
11
12
13
14
    example_data_path = 'Examples/'
    figure = plt.figure()
    file_paths = glob.glob(path.join(example_data_path, '*.jpg'))
    for idx, img in enumerate(file_paths):
    image = misc.imread(img)
    image = np.asarray(image)
    figure.add_subplot(2,5, idx+1)
    plt.imshow(image)
    predictions = model.predict_classes(image.reshape(1,100,100,3))
    real = path.basename(img)[8]
    predicted = predictions[0]
    title = 'Real : ' + str(real) + ' Predicted: ' + str(predicted)
    plt.title(title)
    plt.show()
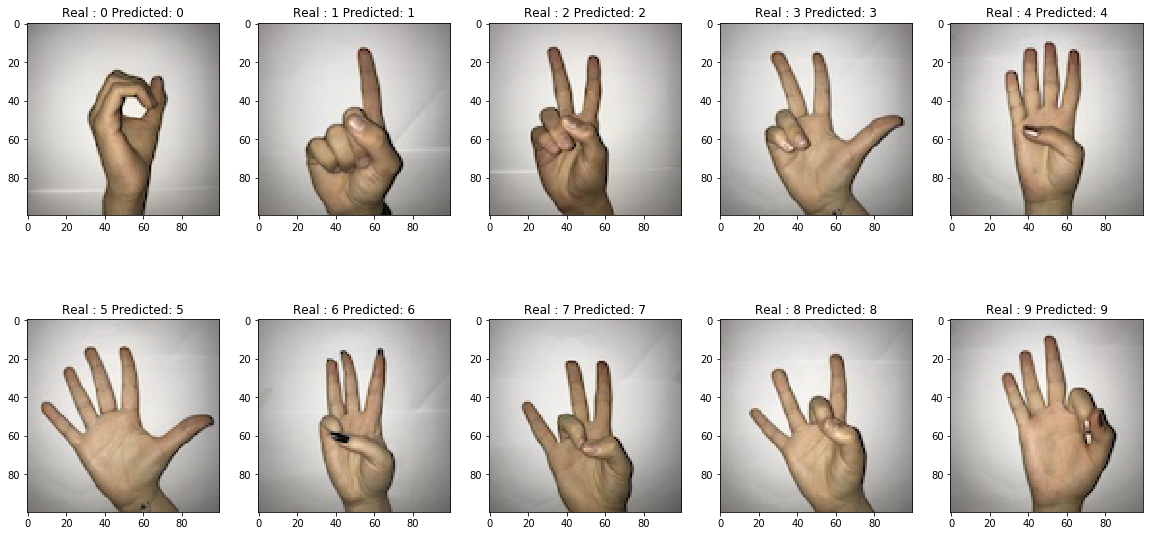
Results
The deep CNN model successfully recognizes all sign language digits scoring 10 of 10 as we can see from the picture above. LeNet architecture did pretty well too, but it missed the digit ‘4’, LeNet was giving label 6 to a digit 4, its scores 9 of 10.
Conclusion
That’s it! I was so glad to put this post together and share with you. I hope it will give you an idea of how powerful convolution neural networks are in image recognition. The trained model (or similar models) can be used in a mobile app that uses the camera for capturing real-time hand signs and displays the corresponding digit, see an example here done by the creator of the used dataset.